
Once again, I'm a complete slacker. I do have a life. I just don't take the time to share it on my blog. I'm hoping to start blogging more often. And so to make up for my lack of yack I'm posting a tutorial. I am all about gifts and all about frugality. I got all this stuff from the Dollar Tree. So for the teachers that have my kids for 2 days a week I thought I'd give them a little May cone. I'll post pictures of those if I remember. But each of the cones will have a flower pen. And here's how I made them.
Materials:
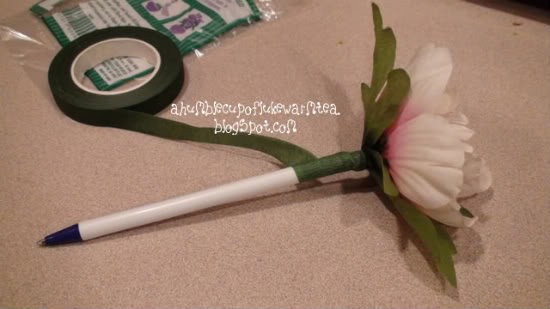
floral tape
ball point pens
fake flowers
various pliers (not pictured, just to get the caps off the pens and cut the flower stems)

Step One:
Get the cap out of the pen. It took a few tries and a few different tools but these pliers were the ones that worked.
 Step Two:
Cut off a flower. Cut the step about 1.5 inches shorter than the barrel of the pen. Then bend up the end of the stem as shown.

Step Three:
Insert the stem into the barrel of the pen and push it in till it stays. It should be a little snug.

Step Four:
Take your floral tape and starting at the top slowly wrap the barrel of the pen. Make sure you wrap any of the flower stem that's sticking out of the barrel as well. The floral tape is stretchy so use that to your advantage. Just don't pull too tight of it will rip. If that happens, just over lap and continue to the bottom of the barrel. Note: I wrapped all the way down and all the way back up.

Step Five:
Admire your handy work.

They look really pretty in a jar all together.

The only problems I ran in to with this craft is that the dollar store floral tape was a little sticky on both sides when wrapping the pens. However, we have been testing the pens for days now and they aren't sticky anymore.
Enjoy this craft. I know I did.
Materials:
floral tape
ball point pens
fake flowers
various pliers (not pictured, just to get the caps off the pens and cut the flower stems)

Step One:
Get the cap out of the pen. It took a few tries and a few different tools but these pliers were the ones that worked.

Cut off a flower. Cut the step about 1.5 inches shorter than the barrel of the pen. Then bend up the end of the stem as shown.

Step Three:
Insert the stem into the barrel of the pen and push it in till it stays. It should be a little snug.

Step Four:
Take your floral tape and starting at the top slowly wrap the barrel of the pen. Make sure you wrap any of the flower stem that's sticking out of the barrel as well. The floral tape is stretchy so use that to your advantage. Just don't pull too tight of it will rip. If that happens, just over lap and continue to the bottom of the barrel. Note: I wrapped all the way down and all the way back up.
Step Five:
Admire your handy work.

They look really pretty in a jar all together.

The only problems I ran in to with this craft is that the dollar store floral tape was a little sticky on both sides when wrapping the pens. However, we have been testing the pens for days now and they aren't sticky anymore.
Enjoy this craft. I know I did.