Showing posts with label craft. Show all posts

Wednesday, February 17, 2016

Review of Home School in the Woods HISTORY Through the Ages Hands-on History Lap-Pak: U.S. Elections

Our family recently to the chance to use and review HISTORY Through the Ages Hands-on History Lap-Pak: U.S. Elections from Home School in the Woods. We've been homeschooling for a really long time and Home School in the Woods has been around for much longer than we've been choosing curriculum. They are a trusted source for high quality curriculum. It was so cool to get a chance to give feedback on one of their products.


HSitW-LOGO-3x3_300dpi_zpstpdbhfsu.jpg


It’s our first time trying a lapbook product. I was a little unsure when I first looked at the product because it honestly at first glance looks like a lot of cut and paste. But because it’s an election year and I really want my kids to get an idea of what’s involved in the election, I gave it a go.


Elections_Lap-Pak Cover Image_zpszrbqjobd.jpg


Here’s a little information on the product. It’s broken down into 21 sections/projects. 


  1. Definition of Election
  2. Different forms of Government
  3. The American Experiment
  4. The Three Branches of Government
  5. Suffrage
  6. Who Do We Vote For?
  7. Terms of Office
  8. A "Handful" of Political Parties
  9. Caucuses and Primaries
  10. National Conventions
  11. The Presidential Campaign: Platform
  12. The Presidential Campaign: Stump Speaking
  13. The Presidential Campaign: Media — News Source
  14. The Presidential Campaign: Campaign Advertising — Spreading the Word!
  15. Raising Money
  16. Statistics
  17. Election Day
  18. The Electoral College
  19. Inauguration Day
  20. The Electoral Race!
  21. The "Vocabinet"


Each section has an audio portion that give you the information that’s also presented in the booklet that you print out and assemble. You can use the booklet and audio as a read-along for emergent readers. My daughter preferred me to read the sections to her as we worked on the different parts of the lapbook.


2016-02-09 12.03.56.jpg


You can see she really loves the coloring part. The audio portions range from 1-7-ish minutes which is very easy to fit into any school day. I printed out portions as we got to them but you could print it all out at once. I found it easier for me to cut sections out and she would do the coloring and adding the pieces to the lapbook. My advice is: Get good glue. You want the pieces to stick and stay. My daughter has had a little more experience with the Home School in the Woods as she was in a homeschool co-op class that used the Time Travelers curriculum. She really loves all things crafty.


Here’s some product shots to show the finished product.
ElectionsLapBook-open4_zpsvepzgcie.jpg
The little one on the right actually moves with a brass fastener! So cool!


ElectionsLapBook-open2_zps12z1vclz.jpg
The doors really open!


ElectionsLapBook-open1_zpsosdq6vcq.jpg
I really appreciate all the interactivity that results from the projects. It makes for a fun piece they can hold onto and show off. This was such a fun project. I’m not sure we are lapbooking converts but in the very least we had fun with this particular lapbook.

As a supplement to the lapbook, we also got some books from the library. Here's a couple of the ones we found. Monster Needs Your Vote by Paul Czajak and Vote from Eyewitness Books. 


Click here to see what other Schoolhouse Review Crew members had to say about HISTORY Through the Ages Hands-on History Lap-Pak: U.S. Elections from Home School in the Woods!


clickformorereviews600x160_zpsc2cf0855.png


Thursday, December 1, 2011

Free Christmas Advent Calendars and Printables

I've been homeschooling for a long, long time. Did I say long? And I've created a few worksheets and printables over the years to accommodate whatever need we had at the time. You can check out some of my printables over on scribd.com.

But this post is about the Advent Calendars and Printables for Christmas that I am offering. They are embedded here for your enjoyment! The links on the bottom of the printables are all wrong so disregard. But the copyright still stands. It's free to use just don't sell it please. And if you decide to pin it on pinterest I wouldn't be opposed :)

I hope your family enjoys them as much as we do.

This one is the activity calendar. We placed each in an envelope and we open them each day and do the activity.
Activities Advent Calendar                                                                                            

This is the Santa's beard calendar. Each day we glue a cotton ball on the picture till the final day when Santa's beard and hat will be fluffy and white. Our kids don't really "do" Santa but we've had fun with it.
santa countdown to christmas                                                                                            

And finally our family favorite which we've done for years now is the Countdown to Baby Jesus! It's pretty self explanatory. You glue/tape a star on each day until it's Jesus' birthday!
Christmas Advent Calendar                                                                                            

Monday, May 2, 2011

Teachers Appreciation: Sticky Note stands


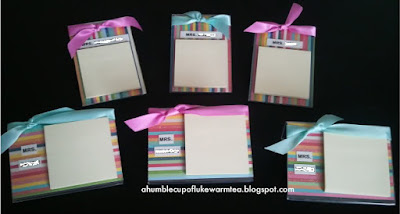
So it's that time of year again. The time when we thank the ladies and gentlemen who work so hard to teach our kids. And even though we homeschool, my kids attend science classes through the local school district. So I thought I'd share what we've made for the teachers this year to show our appreciation.

I've seen these on blog linkies and I'd love to post the link to where I've seen them but I've forgotten. (sorry) If it was you let me know. I'd love to give you credit.

Here's what you need: plastic photo frame, some paper (I used scrapbook paper), sticky note pad, double stick tape, ribbon and I also used a label maker but you can use whatever you want or have on hand.

I got all of this at the dollar tree. Except the label maker obviously. The frames I used were the 3.5 by 5 inch ones. I didn't do anything fancy. Attach the sticky pad to the frame with a couple pieces of double stick tape. Cut a piece of scrapbook paper 3.5 x 5 inches and place it in the frame. I tied a ribbon around the top and I printed little labels with their names. I'm going to place them in see-through goody bags with a colorful pencil and tie them off with a ribbon. These take almost no time and they are so easy.

If you wanted to shake things up a bit you could let the kids draw a picture and use that in place of the scrapbook paper. And here's the finished product in both the vertical and horizontal frames.  What are you making for your kids teachers this year? Leave me a link!

I linked this at Made By You Monday and Craft Catwalk !

Monday, May 3, 2010

Flower Pens: A Tutorial


Once again, I'm a complete slacker. I do have a life. I just don't take the time to share it on my blog. I'm hoping to start blogging more often. And so to make up for my lack of yack I'm posting a tutorial. I am all about gifts and all about frugality. I got all this stuff from the Dollar Tree. So for the teachers that have my kids for 2 days a week I thought I'd give them a little May cone. I'll post pictures of those if I remember. But each of the cones will have a flower pen. And here's how I made them.

Materials:
floral tape
ball point pens
fake flowers
various pliers (not pictured, just to get the caps off the pens and cut the flower stems)


Step One:
Get the cap out of the pen. It took a few tries and a few different tools but these pliers were the ones that worked.
Step Two:
Cut off a flower. Cut the step about 1.5 inches shorter than the barrel of the pen. Then bend up the end of the stem as shown.

Step Three:
Insert the stem into the barrel of the pen and push it in till it stays. It should be a little snug.


Step Four:
Take your floral tape and starting at the top slowly wrap the barrel of the pen. Make sure you wrap any of the flower stem that's sticking out of the barrel as well. The floral tape is stretchy so use that to your advantage. Just don't pull too tight of it will rip. If that happens, just over lap and continue to the bottom of the barrel. Note: I wrapped all the way down and all the way back up.


Step Five:
Admire your handy work.


They look really pretty in a jar all together.

The only problems I ran in to with this craft is that the dollar store floral tape was a little sticky on both sides when wrapping the pens. However, we have been testing the pens for days now and they aren't sticky anymore.

Enjoy this craft. I know I did.